Supercharge Your Git Workflow with Lazygit: A TUI Approach ⚡️
Tired of typing the same Git commands over and over? git add ., git commit -m "...", git push, git checkout ... - the cycle repeats. While the Git CLI is powerful, it can sometimes feel repetitive for common, everyday tasks. What if there was a way to manage your Git repositories visually, right within your terminal, using quick keyboard shortcuts?
Enter Lazygit! ✨
Lazygit is an open-source terminal user interface (TUI) for Git. Think of it as a wrapper around the standard Git commands, providing a highly efficient, keyboard-driven way to interact with your repositories. I’ve found it significantly speeds up my workflow, and it might just become your new best friend too!
This post will guide you through Lazygit’s essentials, showing you how it can streamline your Git interactions.
What Exactly is Lazygit?
Lazygit provides a visual interface within your terminal, broken down into several panels. Instead of typing full commands, you navigate these panels and use single-key shortcuts to perform actions like:
- Staging and unstaging files
- Committing changes
- Pushing and pulling
- Creating, checking out, merging, and deleting branches
- Stashing changes
- Resolving merge conflicts
- Viewing diffs and commit history
Essentially, it aims to make common Git tasks faster and more intuitive.
Getting Lazygit Installed
Installation is straightforward across different operating systems. You can typically use your preferred package manager:
- macOS (Homebrew):
brew install lazygit - Windows (Scoop):
scoop bucket add extras; scoop install lazygit - Arch Linux:
sudo pacman -S lazygit - Ubuntu/Debian: Check the official Lazygit repo for the latest PPA or manual installation script.
- Fedora/RHEL:
sudo dnf copr enable atim/lazygit -y; sudo dnf install lazygit - NixOS: Available via
nix-shell,nix-env, or configuration.nix.
Verify your installation by running lazygit --version.
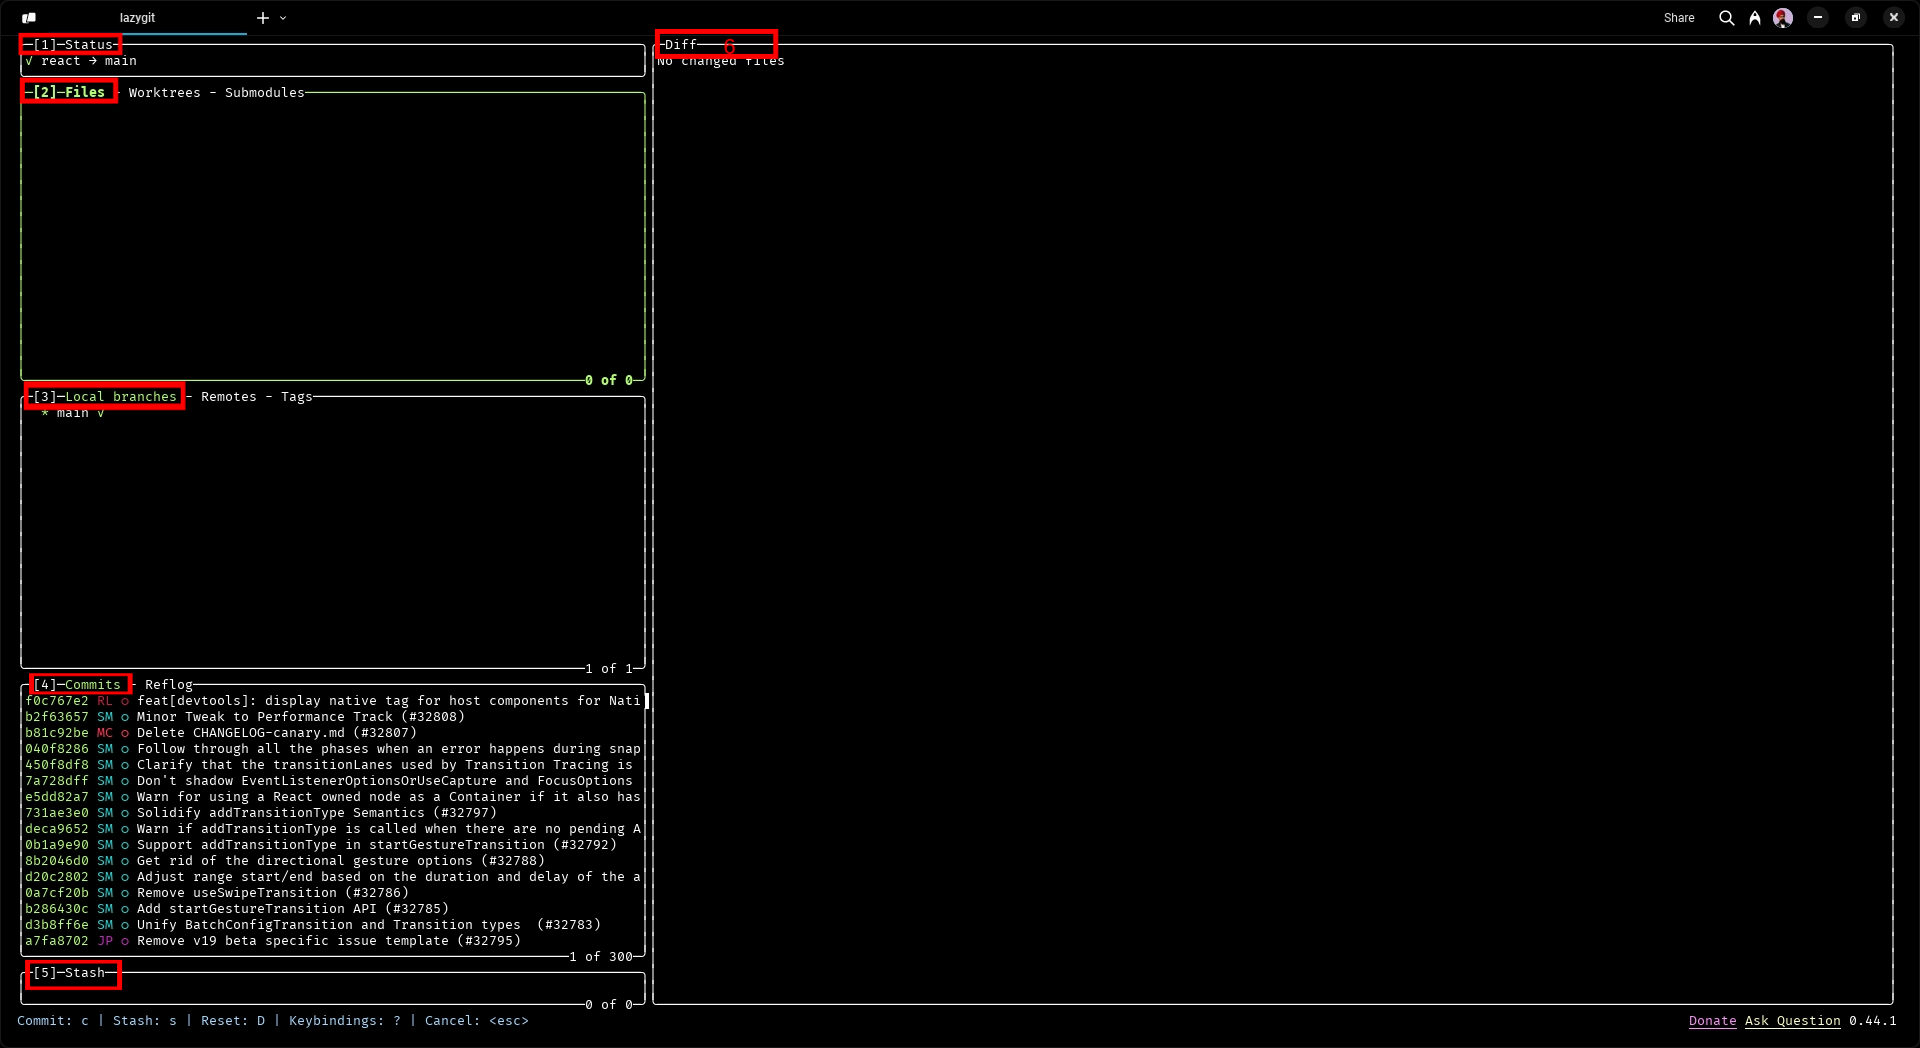
Navigating the Lazygit UI
Simply type lazygit in your terminal within a Git repository to launch the interface.
 (Image source: freeCodeCamp.org article linked below)
The UI typically consists of these key panels:
- Status: Overview of your current repo status and branch.
- Files: Shows modified, staged, and unstaged files. (Key Panel!)
- Branches: Lists local and remote branches. (Key Panel!)
- Commits: Displays the commit history for the current branch. (Key Panel!)
- Stash: Manage your stashed changes.
- Preview/Diff: Shows changes for selected files or commits.
You can navigate between panels using the arrow keys (← →) or number keys (1 through 5). Use up/down arrow keys (↑ ↓) to select items within a panel.
Core Operations with Shortcuts ⌨️
Lazygit shines with its intuitive keybindings. Here are some essentials you’ll use daily:
- Staging & Committing:
space(in Files panel): Stage/unstage the selected file or hunk.a(in Files panel): Stage/unstage all changes in the Files panel.c: Commit staged changes (opens an editor for the commit message).
- Pushing & Pulling:
p(lowercase): Pull changes from the remote.P(uppercase): Push commits to the remote.
- Branching:
- Navigate to the Branches panel (
3or arrow keys). n: Create a new branch.space: Checkout the selected branch.d: Delete the selected branch (prompts for confirmation).
- Navigate to the Branches panel (
- Merging:
- Navigate to the Branches panel (
3). - Select the branch you want to merge into your current branch.
M(uppercase): Initiate merge (offers options like regular merge, squash).- Conflict Resolution: If conflicts occur, the conflicting file appears in the Files panel. Select it, use
spaceto cycle through conflict markers and choose the desired change, stage the resolved file (space), and commit (c).
- Navigate to the Branches panel (
- Undoing & Discarding:
z(in Commits panel): Undo the last commit (soft reset).d(in Files panel): Discard changes on the selected unstaged file (prompts for confirmation). Be careful!
- Stashing:
s: Stash current changes.S(uppercase): View stash options (apply, pop, drop).
- Other Handy Keys:
y: Copy details (like commit hash, branch name, file path) to the clipboard.e: Edit the selected file in your default editor.q: Quit Lazygit.?: Open the keybindings help menu (context-aware!).
Why Bother with Lazygit?
- Speed: Single keystrokes replace multi-word commands.
- Efficiency: Perform complex actions like interactive rebasing or cherry-picking more easily.
- Visibility: Quickly see the status of files, branches, and commits at a glance.
- Reduced Errors: Less typing means fewer typos in commands or commit messages (though care is still needed!).
- It’s Fun! (Okay, maybe subjective, but mastering a TUI can be satisfying! 😉)
Tips for Beginners
Lazygit’s power lies in its keybindings. It might take a short while to build muscle memory.
- Practice First: Create a dummy repository (
git init test-repo && cd test-repo) and play around with Lazygit before using it on important projects. - Use the Help Menu: Press
?often! It shows available commands based on the currently selected panel. - Start Simple: Focus on mastering staging, committing, pushing, pulling, and basic branching first.
Takeaway 👍
Lazygit offers a compelling alternative to typing raw Git commands for many routine tasks. By providing a visual overview and efficient keyboard shortcuts within your terminal, it can significantly boost your productivity and make version control feel less cumbersome.
Your Thoughts? 🤔
Have you tried Lazygit or other Git TUIs like tig or gitui? What are your biggest Git workflow pain points? Will you give Lazygit a shot? Let me know in the comments!
Further Reading & Attribution:
This post was inspired by the excellent article “How to Use Lazygit to Improve Your Git Workflow” on freeCodeCamp.org. For more detailed explanations and GIFs of the actions, check out the original article!
Also, be sure to visit the official Lazygit GitHub Repository for documentation and source code.